CROQUET: Getting Boundary Balls Into Play
Coaching Notes
University of Oxford
Croquet
Club
The aim once you have hit in is to gradually get control of all the
balls. The first task is usually to move balls off boundaries
when
you are scrabbling around trying to get any sort of a break
going.
Subsequently you can bring any remaining balls on boundaries into
play.
There are three main methods involved in getting boundary balls into
the
break.
Levering balls off boundaries.
This
is generally done at the start of a turn when trying to establish a
break.
Whenever possible attempt to lever a ball which is on a boundary a
little
further off the boundary, e.g. if you take-off from a boundary ball
make
it a thickish take-off so that the ball ends up say 1ft. in from the
yard
line; if you roquet one of two adjacent balls on the boundary, play a
little
stop-shot or roll (rather than a take-off) to get a rush on the second
ball thus moving the croqueted ball a little more into the lawn. The
result
of this is that when you next get the opportunity to rush a ball off
the
boundary close to such a ball, you then have more space to play a
stronger
stop-shot to get a ball well into the lawn whilst getting a rush on the
'levered' ball.
Substituting a ball in the break
with one on the boundary. The second method is to leave a ball
near the centre of the lawn and take-off to a boundary ball. The aim,
as
always, is to keep all of the strokes simple. If the critical stroke in
your method relies on a 9:1 pass-roll at an 87½° split angle
it may fail!
Cannons and Promotions. These are dealt with elsewhere.
Levering Balls off
Boundaries
Any time you have an interaction with a ball on a boundary you want to
move it slightly more into the lawn. Hence if you come out of a hoop
and
have a rush to a boundary ball, you rush your reception ball to within
a few feet of the boundary ball, then play a stop-shot to get a rush on
the boundary ball to your next hoop whilst pushing the croqueted ball
out
into court. Do not be too ambitious - nothing is gained if you fail to
get your rush on the boundary ball. Choose narrow croquet strokes, they
are easiest. If necessary move the ball into the lawn in two bites. In
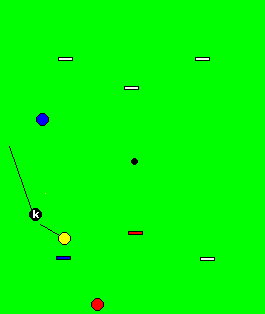
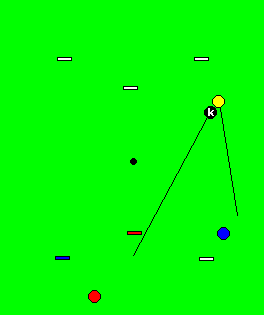
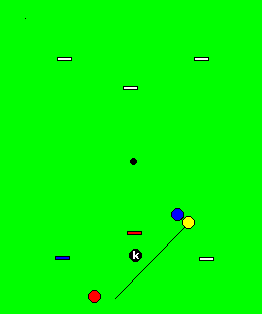
the example below the striker hits one of a pair of balls on the
boundary.
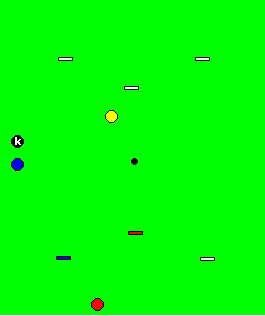 |
Yellow, for hoop #1, decides to shoot at Blue and Black at
the start
of a turn, and hits Blue. |
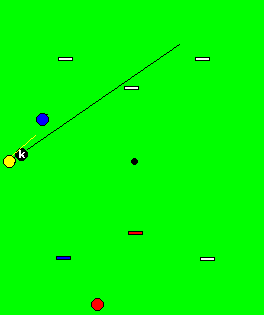
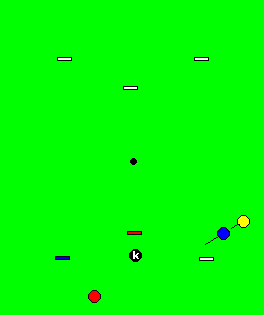
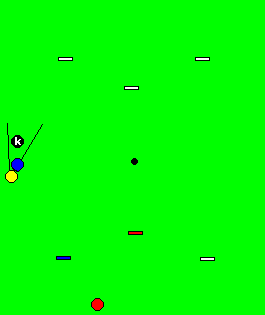 |
Given that Black is close to Blue it is straightforward to
get a rush
on Black towards hoop #1. Rather than do a take-off however a small
roll
or, better, a stop-shot is used to put Blue out into the lawn. A
stop-shot
is preferable as you can place the striker's ball accurately with this
stroke.
(Had Black been hit first, a small stop-shot would be
played feeding
Black out from the boundary whilst getting the rush on Blue. It would
not
matter if Black were played South down the lawn. What is required is
space
between the boundary and the ball).
|
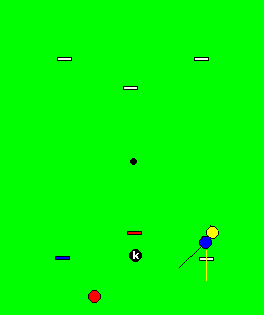
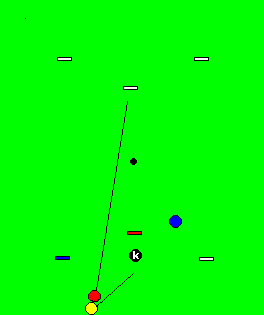
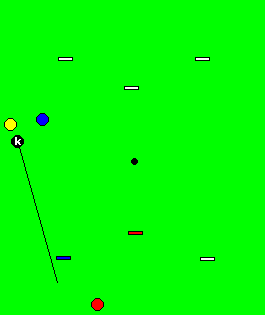 |
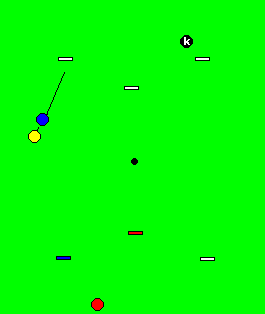
Yellow can now rush Black to hoop #1...
(picking up Red is an exercise described later)
|
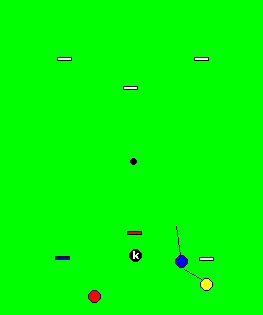
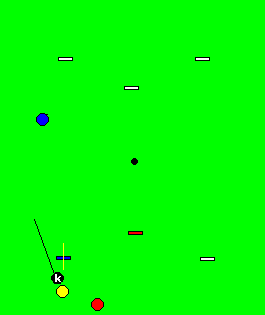 |
... and croquet Black so that it can be rushed near to Blue
after running
hoop #1. |
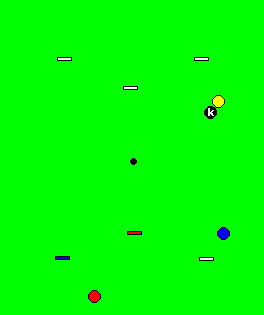
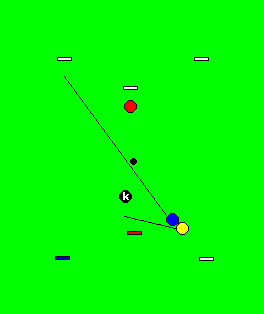
 |
After running the hoop, Black is rushed near to Blue - not so
close
that there is no room to play a shot which will allow Black to be sent
towards hoop three. Ideally it will be to a position close to the rush
line on Blue towards hoop #2. This means that subsequentlyYellow will
be
approaching Blue along its rush line. |
 |
In the subsequent croquet stroke, Black is aimed in the
direction of
hoop #3, but the priority in the stroke is to get a good rush on Blue.
If Black only goes halfway but you get your rush on Blue you will get
your
hoop and the opportunity to rush Blue close to Black after the hoop to
keep things going. If however Black is wonderfully placed as a
three-ball
break pioneer on hoop #3, but you fail to get the rush towards hoop two
and so break down...
As always the basic priorities, in order, are:
-
Make your next hoop
-
Keep the break going
-
Do fancy stuff (peeling etc.)
|
 |
We now have the start of a three-ball break; Blue is rushed
to hoop
#2, and a rush is set after the hoop to a position where Blue can be
sent
to hoop #3 and Black approached down its rush line to the hoop in the
subsequent
croquet stroke. |
Swapping a
Boundary
Ball with one in the Lawn
This is generally used once you have a 3-ball break in progress,
whereas
the levering technique is used when you are scrabbling around trying to
get any sort of a break going.
Normally if you have a 3-ball break you would choose to pick up a
boundary
ball as you made hoops near it.
 |
[Continuing the above example.]
Yellow is the striker's ball and it has just made hoop #3 off
Black,
and roqueted it after the hoop. Blue is a good pioneer at hoop #4, but
Red is on South boundary. How should Red be brought into play?
Conceivably, it could be mooted that Yellow could take-off
down to Red
and then croquet Red to #5 whilst getting the rush on Blue. This
however
is a pass-roll and getting to rushing position on Blue is hindered by
hoop
#4 and Blue itself. Also we would not be playing down rush lines
towards
our pioneers.
|
 |
More straightforward is to just continue playing a three-ball
break.
Hence Black is croqueted to hoop #5, and Yellow attempts to get the
rush
on Blue into hoop #4.
For reasons to become apparent later, Black is placed
between
Red and hoop #5.
|
 |
Yellow rushes Blue to hoop #4. |
 |
Blue is placed beside the hoop so that once Yellow has run
the hoop
... |
 |
.. it can be rushed somewhat towards the centre of the lawn.
It is not necessary to move it far, indeed it does not want to
be moved
too far, otherwise ...
|
 |
... the subsequent take-off to the boundary ball, Red,
becomes more
difficult. Red is roqueted, possibly moving it to a more advantageous
position.
Note it is not essential to get Yellow on the yard line - just
within
hitting distance of Red.
|
 |
We are once again are in a three-ball break position; Red is
sent to
hoop #6 as a pioneer, and Yellow approaches Black along its rush line
in
the croquet stroke.
The placing of Black between the boundary ball (Red) and the
hoop means
that we can approach it up the rush line. This is the most
difficult
stroke in the process.
|
 |
At this stage all of the work is done. Black is rushed to
hoop #5,
and is then positioned such that, after running the hoop, Yellow can
rush
either Blue or Black South down the lawn.
The subsequent stop-shot loads #1-back, and hopefully gets a
rush on
the new pivot towards the pioneer on hoop #6. It depends on the exact
positions
of balls as to which order they are struck.
For example, Yellow has run the hoop and rushed Blue to the
side and
slightly South. From here #1-back is loaded with Blue, and Yellow gets
a position to rush the new pivot (Black) closer to Red.
Result: a four-ball break with no particularly difficult shots.
|